MAKE THIS: Printed Pinwheels for Spring!

Photos + Tutorial by Bonnie Kaye Whitfield

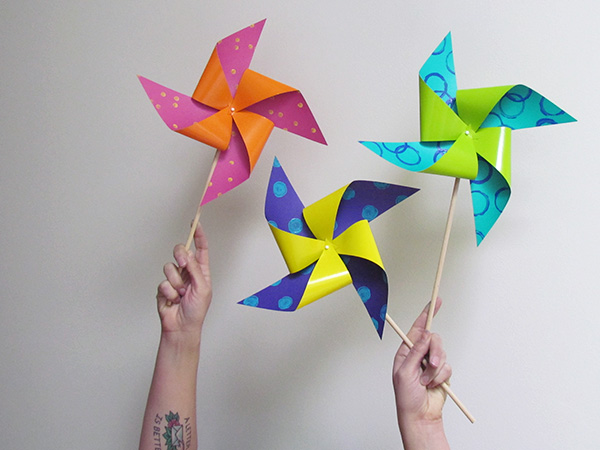
Ever since I was a kid, I’ve loved pinwheels.  This printed version of pinwheels is a perfect way to lift your spirits after months and months of winter.  Make as festive decor for your next party or create with your kiddo on a rainy day.
Blog_5_Pic_15

You will need:

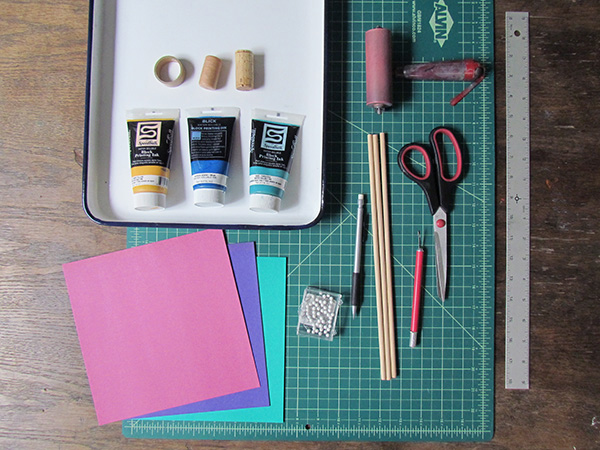
  • square cardstock, ideally different colors on each side
  • scissors or x-acto
  • ink for printing, either water-based block printing or stamp pads
  • ink tray + brayer if using block printing ink
  • circular tools for printing – pencil eraser, wine cork, empty cardboard tape ring
  • dowel rods
  • small tacks/pins
  • scrap piece of cardboard

Blog_5_Pic_1

Gather your materials.  Try to work with colored cardstock.  You can test out other papers to see if they hold up to lots of blowing and twirling.  If you have colored ink pads (I didn’t…) then I would use those before turning towards block printing ink, as the prints will take less time to dry.
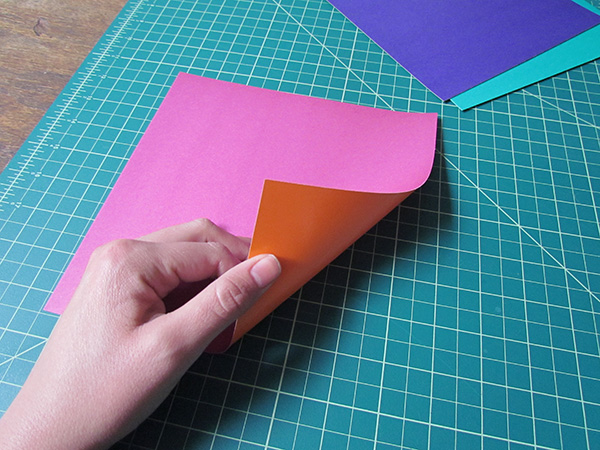
Blog_5_Pic_2

If you can find paper that is different colors on each side, it will add to the colorful pop of the pinwheels.  If not, no biggie.  Just work with whatcha got.
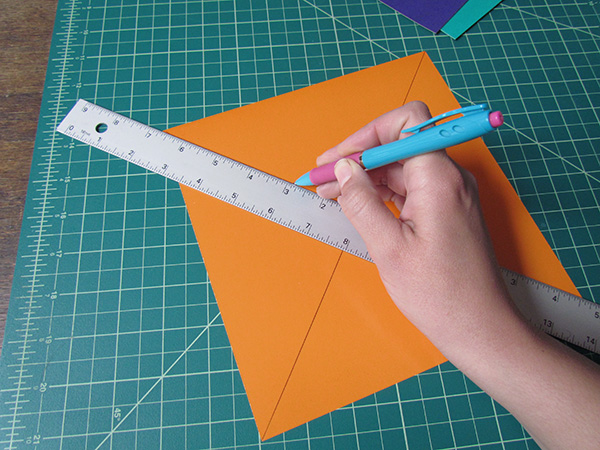
Blog_5_Pic_3

Before you begin printing, go ahead and draw two lines of the backside of your printing side.  Use a ruler and a pen to line up opposite corners and draw a line, making a big X across the paper.
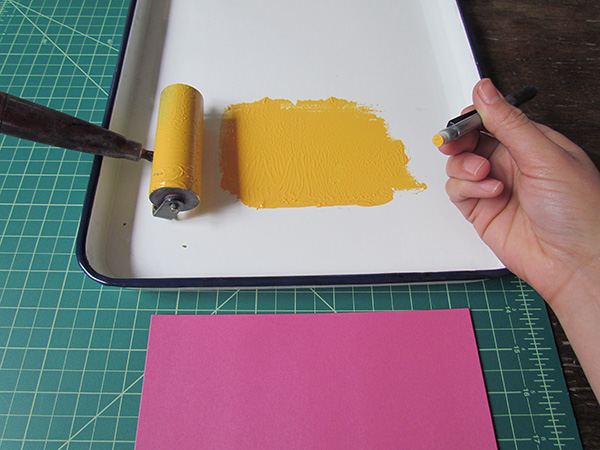
Blog_5_Pic_4

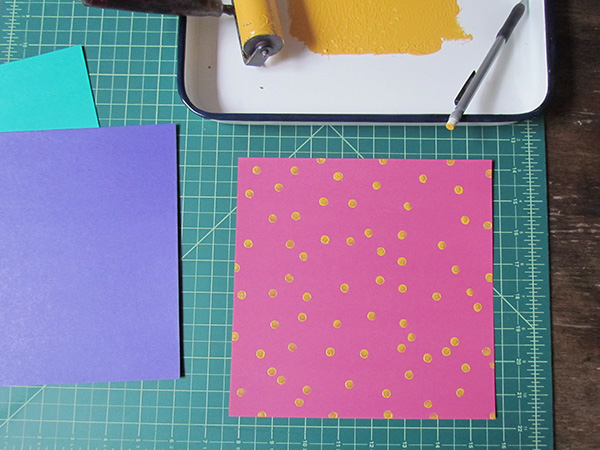
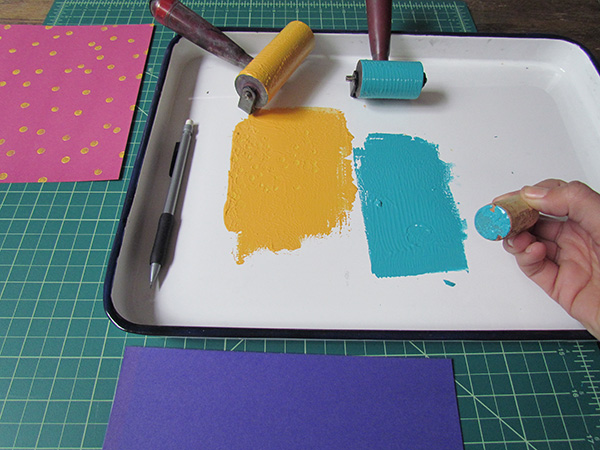
Now for printing fun!  Roll out some ink in a tray.  Dip your pencil eraser in the ink and go to town.  Pencil erasers make the perfect tiny dot.
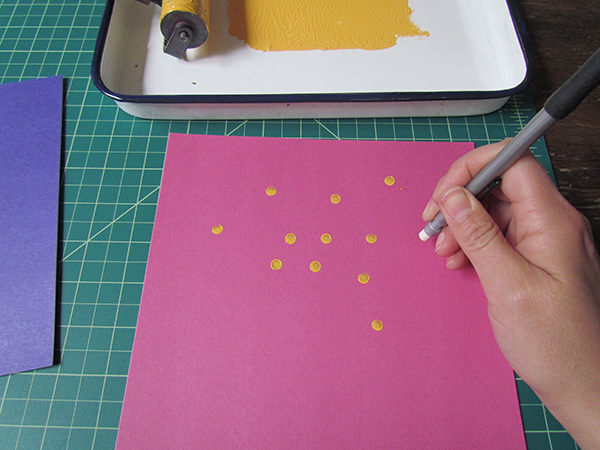
Blog_5_Pic_5 Blog_5_Pic_6

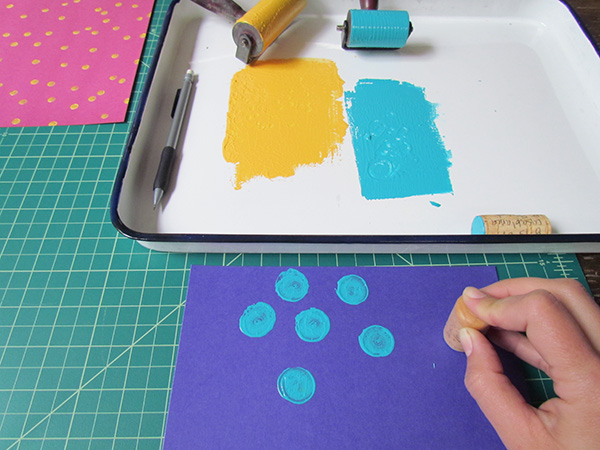
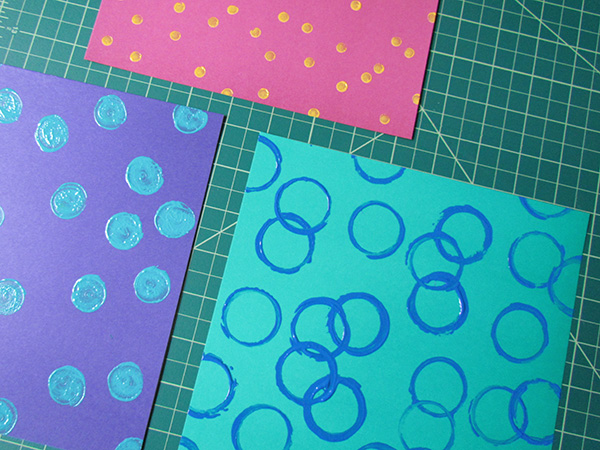
Feel free to just use a pencil eraser for all your printing, or grab some other circular items to print with.  Here, I’m using a wine cork for a larger circle blob.
Blog_5_Pic_7 Blog_5_Pic_8

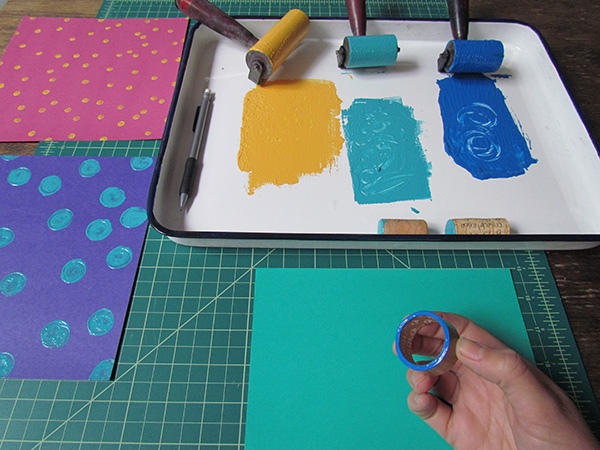
I also had an empty tape roll on hand.  I recommended scouting out other circular items in your recycling bin, like a toilet paper roll or yogurt container.
Blog_5_Pic_9 Blog_5_Pic_10

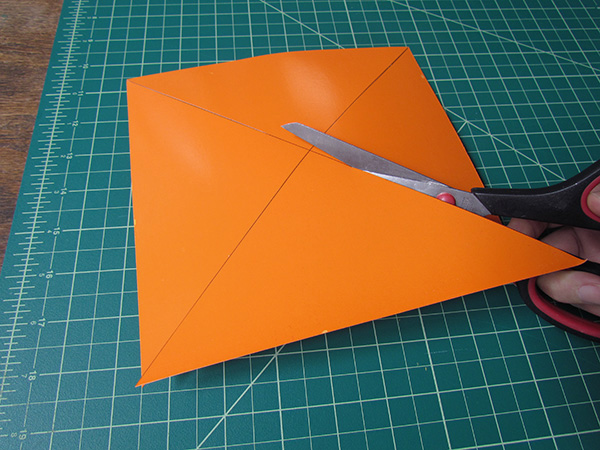
After the prints have thoroughly dried, grab your scissors and begin to cut on the lines that you drew at the beginning.  Cut on each line until you get about an inch away from the center point – then stop!
Blog_5_Pic_11

Now for the only tricky part … pinning them all together.  First, unless these are going to be purely decorative and you don’t want them to spin, you’re going to want to cut out a few dime-sized circles out of cardboard.  This will help the pinwheels spin.  Set the cardboard circles aside.
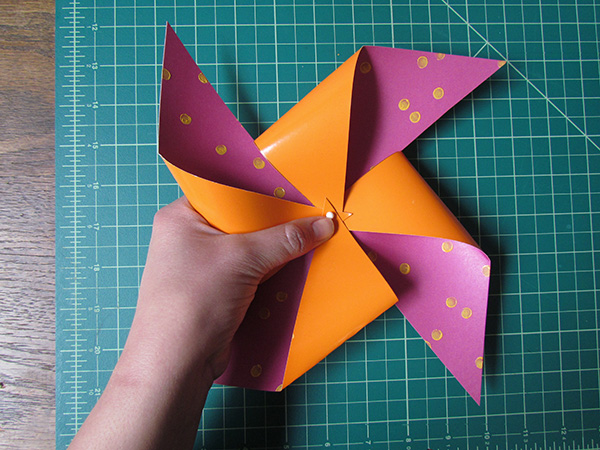
Blog_5_Pic_12

Begin by folding down every other corner of the pinwheel and hold in one hand.  Grab the pin with your other hand and push through the center, making sure you are going through all 4 corners that you are holding down.  Grab one of your cardboard circles and press it in between the paper pinwheel and the wooden dowel rod.  I find that a couple long presses in the dowel does the trick for me, but then again, I don’t have a 4-year-old that’s going to run around with it.  So if you do, you might want to add a dab of glue before jamming into the dowel.
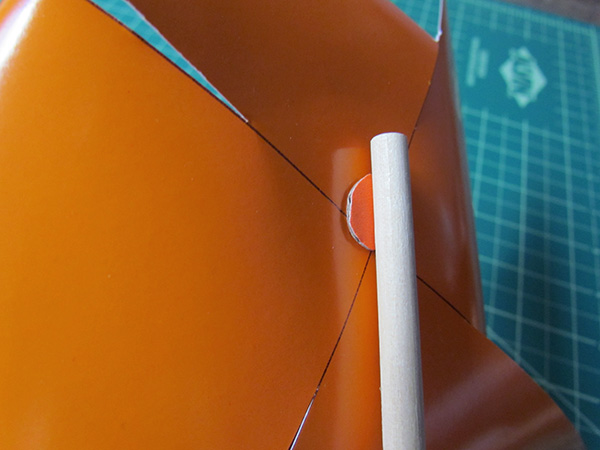
Blog_5_Pic_13

Lastly, if you really want some good spin action, you’ll need to play around with moving the paper around so that it it doesn’t hit the dowel rod when you try to spin it.
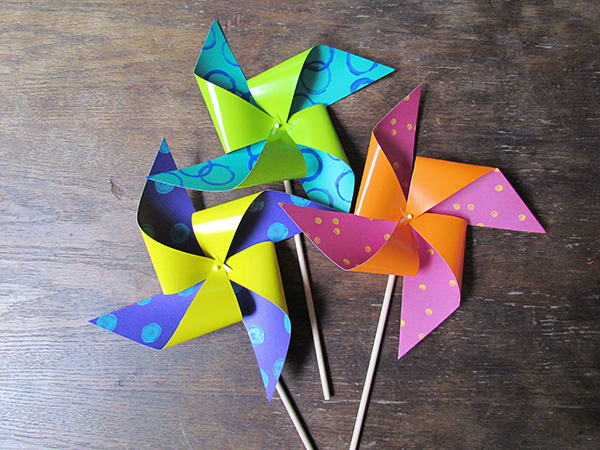
Blog_5_Pic_14

So there you have it – springtime pinwheels + insta mood lifter!

———————————————————————————————————————————–

Bonnie Kaye Whitfield designs and screen prints home textiles + paper goods under the name, Bonnie Kaye Studio.  Products are created to inspire memories at home and around the table.  A donation is made with every purchase to help feed hungry Americans.
www.BonnieKayeStudio.com


Posted in craft projects | Tagged , , , , , , , , , | Leave a comment

NoLibs Sidewalk Sale This Weekend!

It’s spring cleaning time so that means SALES SALES SALES! We need to make room for all the new items we are getting in.  We got together with our neighborhood retailers to offer up a weekend of discounts.  This is the best time to shop in Northern Liberties!

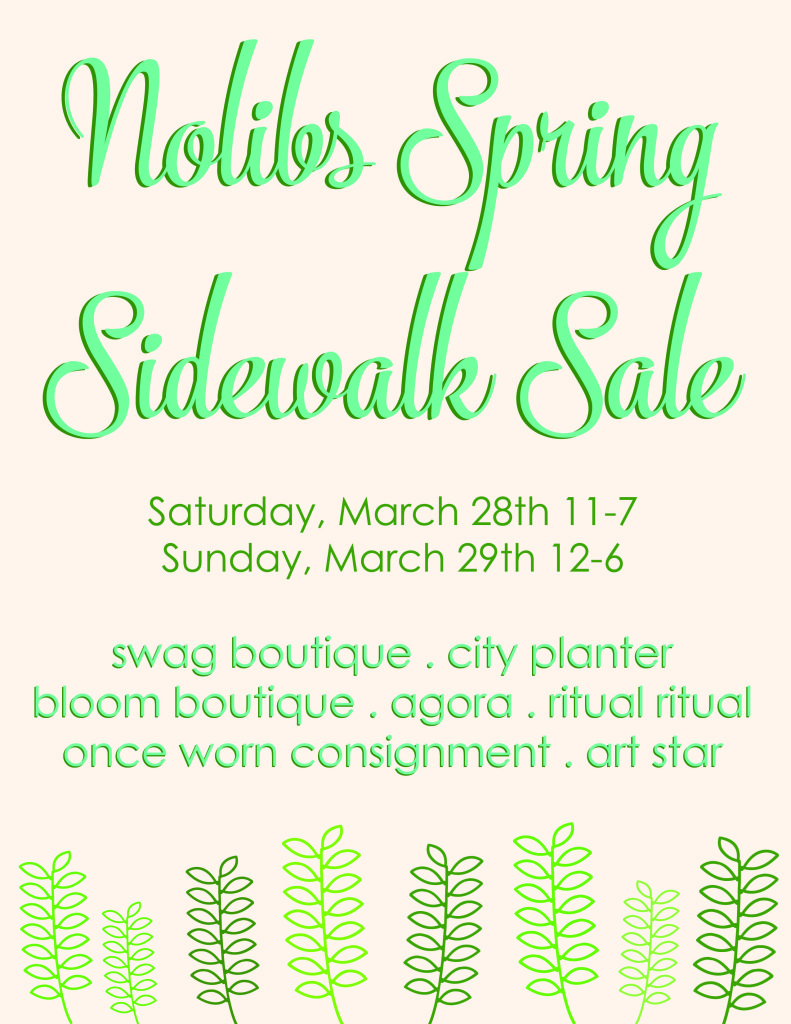
Spring Sidewalk Flyer

We will be sticking our clearance items out on the sidewalk for you to rummage through.  Clearance stuff will be marked up to 80% off.  All regular prices goods inside will be 20% off and we will take an additional 10% off indoor sale items.

Also participating are Agora, Bloom, City Planter, Once Worn Consignment, Ritual Ritual, and Swag. So grab your favorite shopping buddies and head over to Northern Liberties for a day of shopping this weekend! Visit our FB event invite to see the type of discounts each shop is offering.

Fuel up at our following faves:

Quick Bites/Coffee/Tea: Soy Cafe, Random Tea Room, One Shot Coffee
Breakfast/Brunch: Honey’s or Cafe La Maude
Good Beer or Cocktails: Abbaye, Jerry’s, 700 Club
Dinner/Lunchy Noms: Abbaye or Bourbon + Branch (good cocktails too)

Posted in events | Tagged , , , , , , , , , , , | Leave a comment

Christie’s Mini Weaving Tutorial (on a “junkmail” credit card loom)

Tutorial and Photos by Christie Sommers 
pic1
You will need:
picnumero1
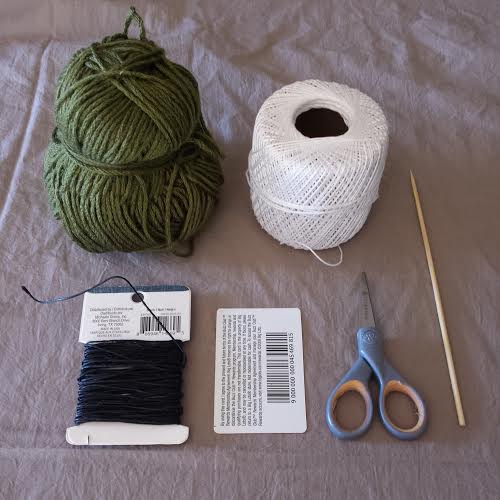
*An old card of the un-needed variety… pre-approved credit cards, price club cards, your old West Coast Video card… Just make sure it’s nice and firm, no flimsy paper ones.
*A variety of string/yarn/twine. In this tutorial I am using a thin cotton cord for my warp (I’ll explain soon). For my weft I am using waxed cotton cord in black, thin gauge yarn in green, and more of the white cotton cord I used for the warp.
*scissors
*quilting needle (not shown)
*ruler
*pencil
*toothpick, wooden skewer, or short section of brass tubing
pic2
Chances are, the card you are using is 2″ x 3.5″. Turn your card sideways so that the 2″ side is at the top and the bottom. Start by marking every 1/4″ across the top and bottom (see pic).  After all of your marks are made, come back with your scissors and make a small cut in each pencil marking. Cut about 1/4″ into the card each time trying to be consistent.
You will now begin to lay down your weft. The weft is the base that you will be weaving in and out of. I started in the top left corner bringing the thin cotton cord through the first cut from back to front. Bring the string down to the first cut in the bottom left corner, wrapping around the back and coming back up through the 2nd cut on the bottom left corner (see pics).
pic3 pic4 pic5
Continue this motion wrapping back and forth until you get to the end. You will have a tail hanging from your starting and end points. Make sure these tails are at least twice as long as your needle.
Now you are ready to start weaving!
I threaded my quilting needle with the black cord and wove under one, over one from left to right. When you come back for your return pass make sure you do the opposite of what you did on the previous pass. If you went under the warp on the last pass, go over the next time. It sounds more confusing than it really is… see pic.
pic6
pic8
Continue for as long as you’d like before changing colors.
pic9
To change colors/yarn simply trim your previous weft (black cord) leaving a tail that is at least twice as long as your needle. Begin weaving the next color through starting on the opposite side of the previous weft’s “tail”.
pic10
Continue weaving and changing color/yarn as desired until you simply cannot fit any more rows. You can use your needle to push each row up to the top so they fit snugly together.
You’re probably wondering what to do with all of those little tails hanging out of the sides of your weaving. Some people leave them as a deliberate design choice. For this weaving, I am tucking these little tails in for a nice finished edge.
To tuck: starting at the top left, thread the first tail onto your needle. Tie the tail to the first string of warp and slide the needle down through the loops of the weft carefully trimming the tail and letting it slide back slightly into the loops so that it is hidden.
pic11 pic12
Once all of your tails are tucked in, you can stop here or add fringe if you like.
For the fringe: Because this is such a small weaving, I am going with a very simple fringe. Cut seven 4″ pieces of the green yarn.
Thread the first one onto your needle and run the needle through the bottom left warp loop.
pic13 pic14
Line up the ends of the 4″ piece of yarn and tie it into a knot, sliding the knot snugly up against the bottom of the weaving before tightening.
Repeat across the remaining white warp loops with the remaining 4″ yarn pieces.
Do a final trim across the bottom of your fringe.
Finish your weaving by lining up a 8″ piece of black string with your toothpick/skewer/tubing and thread it through the top warp loops. Tie a knot in your black string & you can easily hang it on a nail. Heck, you can even use a longer string and make it into a necklace… go nuts.
You’re finished!
Once you get the hang of the simple act of weaving one over, one under…. take to the internet or your local library and research some new techniques!
*Disclaimer: I am not a trained weaver. I am self taught. Most people start with the fringe first and work their way up.  Starting at the top works for me… so that is how this tutorial goes;)
Enjoy!

—————————————————————————————————————————————

Christie Sommers is the designer and maker behind West Oak Design. She handcrafts small batch and one of a kind goods for home, women, and kids in her Wyndmoor, Pa studio.www.westoakdesign.com

Posted in Uncategorized | Tagged , , , , , , , , , | Leave a comment

Art Star Craft Bazaar is Coming to Asbury Park!

We’ve got some exciting news!! We are bringing our Art Star Craft Bazaar to Asbury Park, New Jersey!

Asbury Web

Don’t worry, we will still host our bazaar twice a year in Philly.  We’ve been looking for a 2nd home for our show for quite a while now, so this will just be another location added to our roster.

Asbury Mural

Awesome Mural in Asbury Park by Porkchop. Photo Courtesy of Move For Hunger.

Asbury Park is a perfect fit for our show.  There is already a flourishing creative scene happening there and also tons of independent shops and restaurants.  It is just our style.

We will be bringing our bazaar to Bradley Park, which is a city owned park situated right across the street from the Asbury Park Boardwalk and their Convention Hall.  The show will be held during the city’s peak summer season, on the weekend July 25th + 26th.  The city has a devoted art/craft community, which is active year round.  We hope to attract this audience, tourists, as well as our own Art Star following.

We are excited to be partnering with Asbury Park based non-profit, Move For Hunger. We will be collecting a $3 suggested donation at the door and 100% of that will go directly to this amazing organization.

Move For Hunger is a 501(c)3 nonprofit founded in 2009 to transform moving into an opportunity to reduce food waste and help feed the hungry. Move For Hunger is a national organization working with over 600 relocation partners and thousands of real estate agents to bring awareness to hunger in America. Currently over 1,151,000 residents of New Jersey struggle with hunger. Move For Hunger is working to ensure less food goes to waste and more is delivered to those in need. In just five years, the Move For Hunger program has delivered over 4.5 million pounds of food to community food banks nationwide.

Food_Drive

Photo Courtesy of Move For Hunger


The Asbury Park Art Star Craft Bazaar will be very similar to our popular spring bazaar at Penn’s Landing Great Plaza in Philadelphia.  Around 100 art/craft vendors will be set up selling their wares in Bradley Park.  On that note, we are now accepting vendor applications for this show!  So if you are an artist or crafter who would like to apply to participate, please go here

We are also looking to bring in some locally based art organizations/non-profits to set up at our show in exchange for providing a free interactive art/craft project, or as we call them “make + takes”, for guests to come and make something that they can take home with them that day.

We are so excited to bring our bazaar to this amazing city and we hope you are to!  Please continue to check the site for updates on the show.  If you are a business based in Asbury and want to work together – cross promote or provide a make + take, please get in touch with us.  We are looking to collaborate and involve the city as much as possible!

Posted in ascb, Uncategorized | Tagged , , , , , , , , , , , , | Leave a comment

Christie’s Paint Chip Wall Art DIY

Photos and Tutorial by Christie Sommers

Photo 6

You will need:

*paint samples from your local hardware/paint store
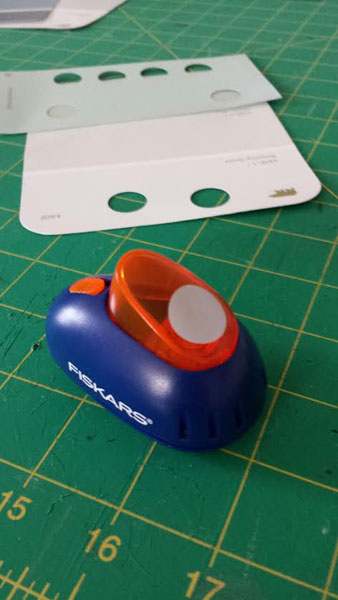
*a circle punch (found in the scrap booking section of your nearest craft store). I used a 5/8” punch.
*a glue stick (I prefer Elmer’s Craft Bond)
*a sheet of card stock (this is what you will glue your circles to)
*ruler
*pencil
*a picture frame if you would like to display your finished project

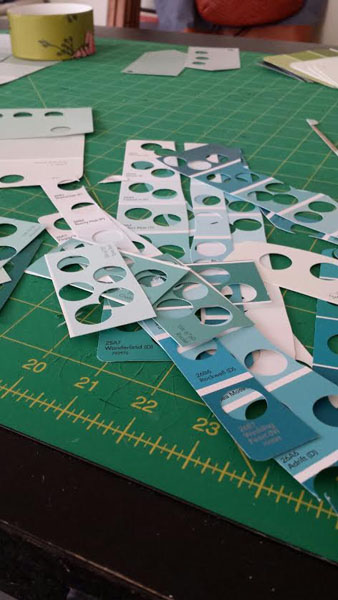
Start off by punching out your circles.  For my 4-1/2” x 7” collage I used 161 circles. Arrange your circles by color in 3 piles: lightest colors, mid range, and darkest.

Photo 1 - Copy Photo 2 - Copy

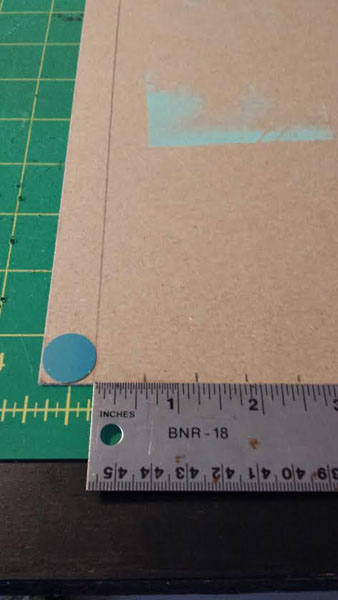
Take your piece of card stock. You are going to draft out a grid so you can line up your circles nice and straight. Because my circles are 5/8”, I went up one side of the card stock marking every 5/8″.  Repeat on the other side of the card stock and you now have the start & finish point of each line.

Photo 3 - Copy

Once your lines are drawn, start at the bottom of your card stock and glue a random mix of your darkest circles across the first line.

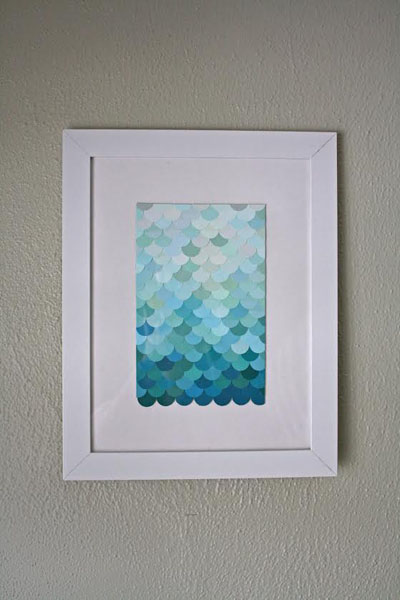
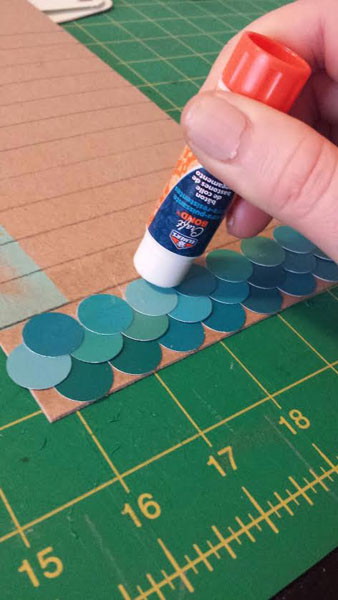
The next row will be placed between your pencil lines. Place the first circle of row 2 between the first two circles in row 1 (see pic). Every other row is staggered giving you a fish scale pattern.

Photo 4 - Copy

Continue gluing rows, going from dark to light, until you reach the end of your desired finished project.

Photo 5

If you want straight edges, you will need to do some trimming. I trimmed off the two sides and top of mine. The bottom of my collage will give you an idea of what it will look like if you decide not to trim the edges.

Let the glue dry for at least 10-15 minutes before trimming.

To trim, I used a straight edge ruler, an X-acto knife and my cutting mat. If you don’t have a cutting mat/x-acto… you can take a ruler and line it up along the edge you want to trim, draw a pencil line marking where you will cut, and simply trim with scissors along your pencil line.

Frame & enjoy!

Photo 7 - Copy

———————————————————————————————————————————————

Christie Sommers is the designer and maker behind West Oak Design. She handcrafts small batch and one of a kind goods for home, women, and kids in her Wyndmoor, Pa studio.www.westoakdesign.com

Posted in craft projects | Tagged , , , , , , , , , , | Leave a comment

Bonnie’s Two Piece Tote Bag

Photos + Tutorial by Bonnie Kaye Whitfield

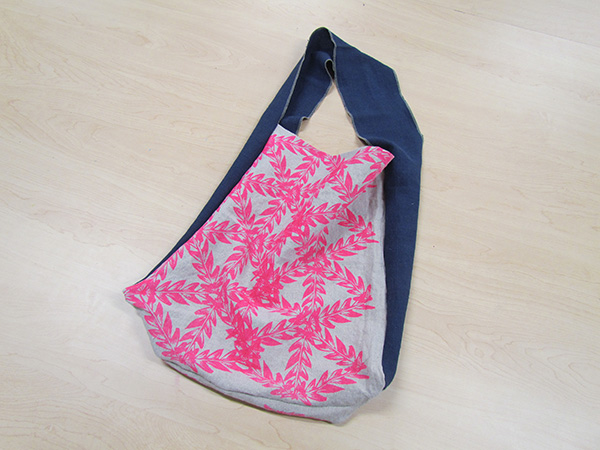
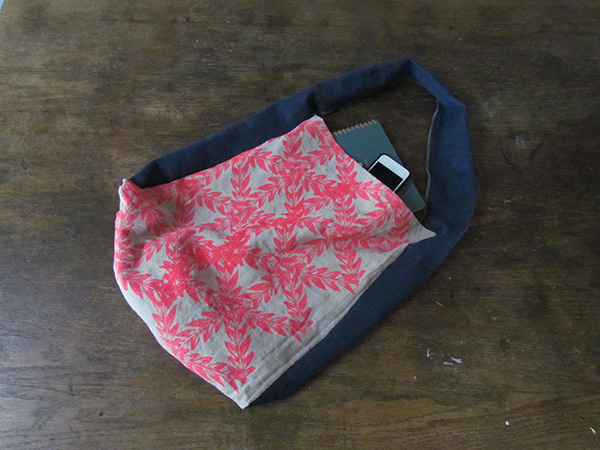
You are not going to believe how quick and easy this tote bag is to make. I first discovered this tote bag design after getting one with a purchase from a major retailer. It is simply constructed of two pieces of fabric. Brilliant.

Blog_4_Pic_11

You will need:
|
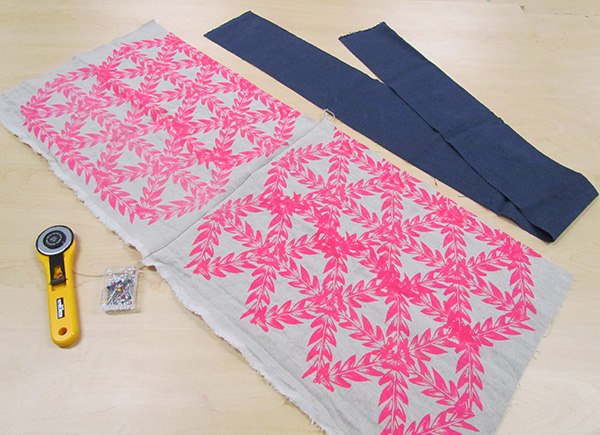
❖ 2 rectangular pieces of fabric

❖ scissors or rotary cutter to customize fabric sizes

❖ pins

❖ serger and/or sewing machine

❖ iron (optional)

Blog_4_Pic_1

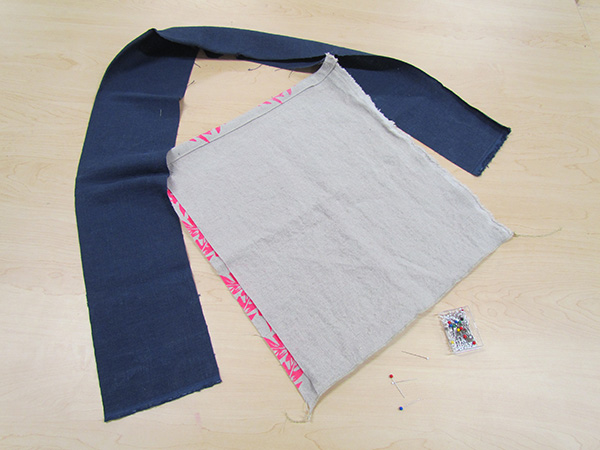
Your two pieces of fabric will determine your overall shape and size of the tote. One piece will serve as the body of the tote and should be wider and shorter. The second piece of fabric will serve as the sides and the strap of the tote and should be thinner (depends on the depth you wish your tote to have) and much longer. For the body of my tote, I’m using some scrap fabric from my studio and you can see that I sewed them together in order to have a large enough piece – so feel free to hinge pieces of fabric together if needed.

Blog_4_Pic_2

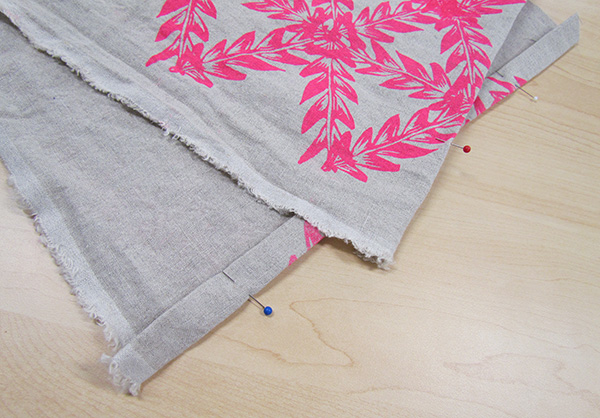
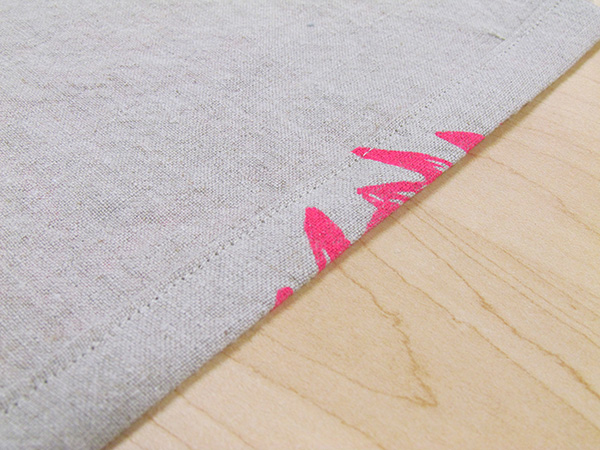
Take the two short ends of your fabric piece that will serve as the body of the tote. Iron and pin a 1⁄2” hem and sew. This will create a more finished look for the top edges of your tote.

Blog_4_Pic_3

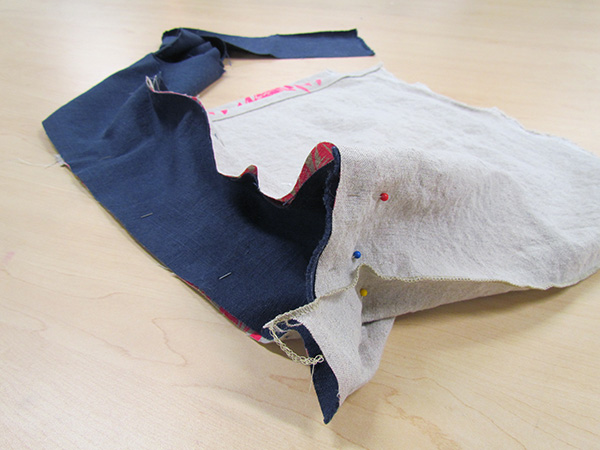
Grab a bunch of pins and your two pieces of fabric and take a seat. Fold the body of the tote, so that the nice sides are facing each other on the inside. You’ll be pinning your tote together from the inside.

Blog_4_Pic_4 Blog_4_Pic_5

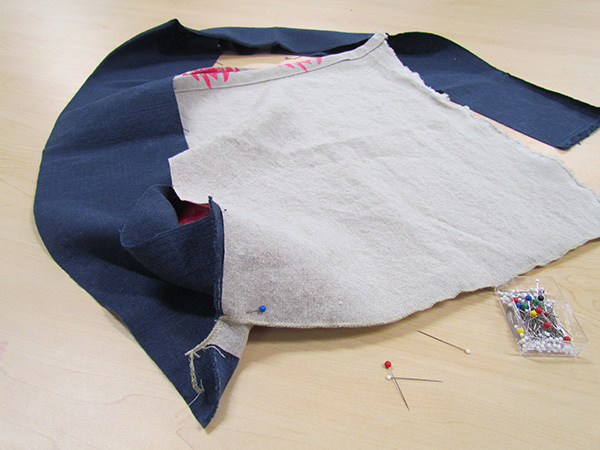
Start by pinning the long piece of fabric to the bottom of the body piece, matching the center/bottoms. Keep pinning as you go around the corner edge of the long piece of fabric. Stop when you get to the top edge of the tote. Repeat on the other side of the tote, starting at the bottom/center of the bag again.

Blog_4_Pic_7 Blog_4_Pic_6

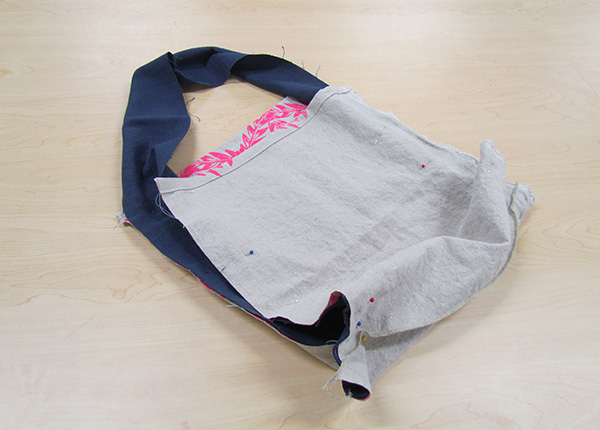
Once the two pieces have been completely pinned together, you are ready to sew. You should also be able to get a pretty good idea of the overall size and shape of your tote at this point.

Blog_4_Pic_8

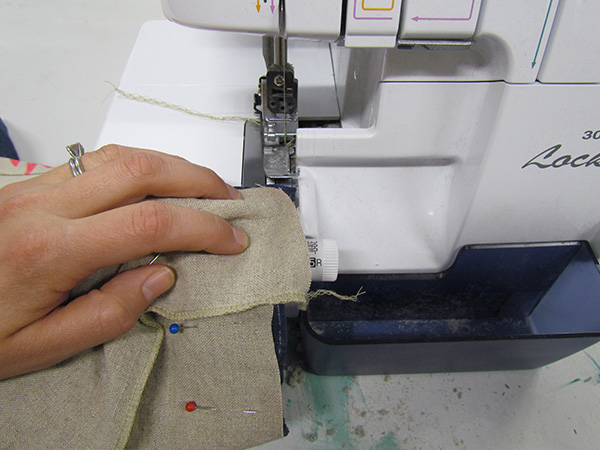
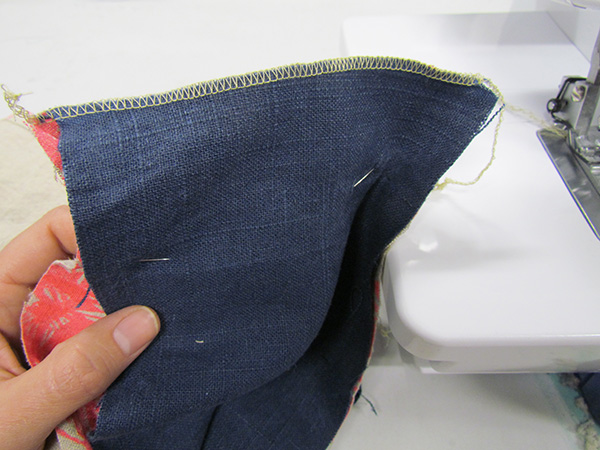
I’m using a serger, but you can also simply use a sewing machine. First, begin by sewing the two bottom edges of the two sides. The length of the stitch will depend on the width of your strap.

Blog_4_Pic_9

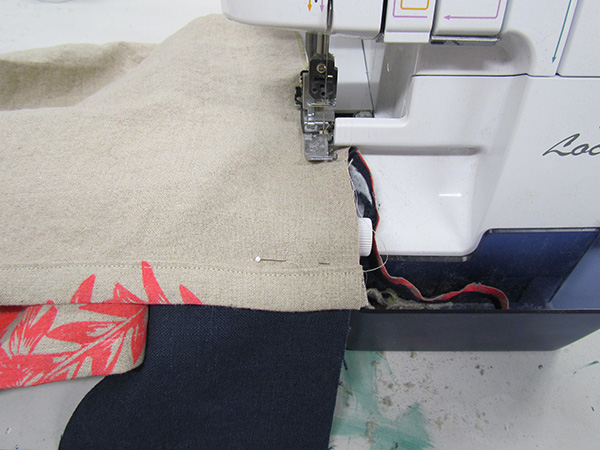
Next, you’ll do two long stitches and that’s it! Begin at one end of the tote and sew over the strap, until you get to the other side of the bag. Repeat on the other side.

Blog_4_Pic_10

Turn the bag inside out and you’ll now have a splendid new tote, perfect for all your toting needs.

Blog_4_Pic_12

———————————————————————————————————-

Bonnie Kaye Whitfield designs and screen prints home textiles + paper goods under the name, Bonnie Kaye Studio. Products are created to inspire memories at home and around the table.  A donation is made with every purchase to help feed hungry Americans. www.BonnieKayeStudio.com

Posted in craft projects | Tagged , , , , , , , , , , , | Leave a comment

Christie’s Hand Stitched Bowl Tutorial

Photos + Tutorial by Christie Sommers

Photo 1
You will need:
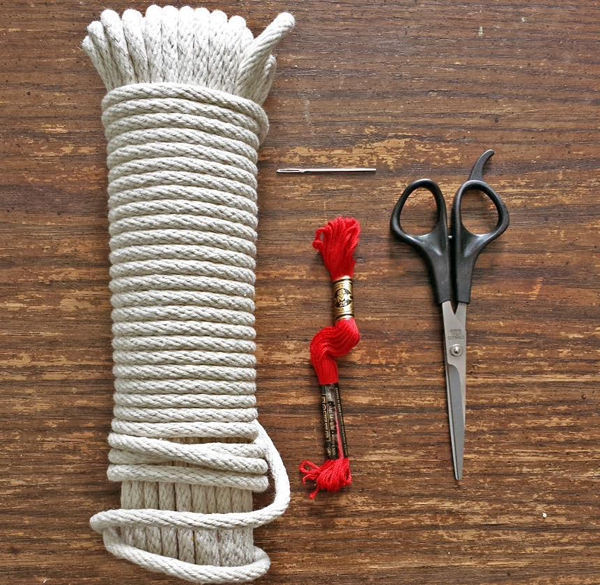
-cotton clothesline
-quilting needle (you can use a regular sewing needle with a thimble but a larger quilting needle is best for passing through the thick clothesline)
-embroidery thread, yarn, or string in color of your choice
-scissors

Photo 9
Thread the needle with colored string of choice and tie a knot at the end.

Use as much thread as you can manage. No more than 3′ should suffice. You can tie more thread on when you run out.

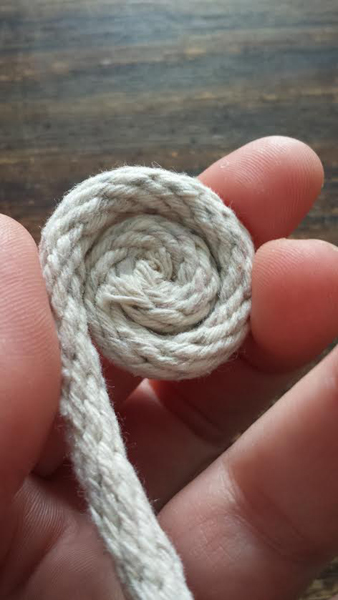
Start by coiling the clothesline between two fingers as shown.

Photo 10
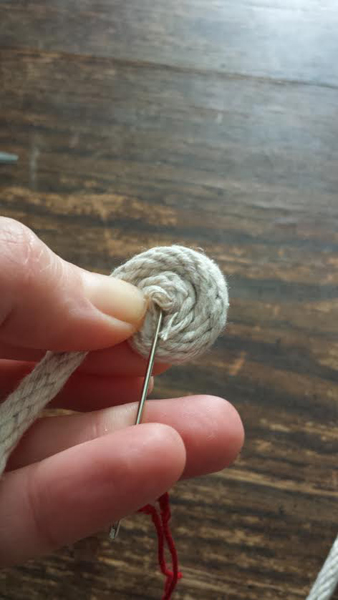
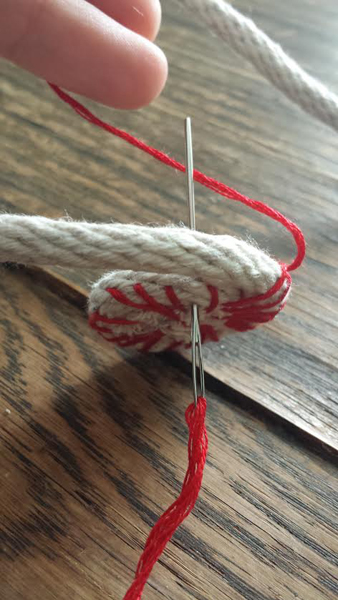
Insert the needle into the center of the coil passing through the layers of rope and exit as shown.

Photo 11 Photo 12
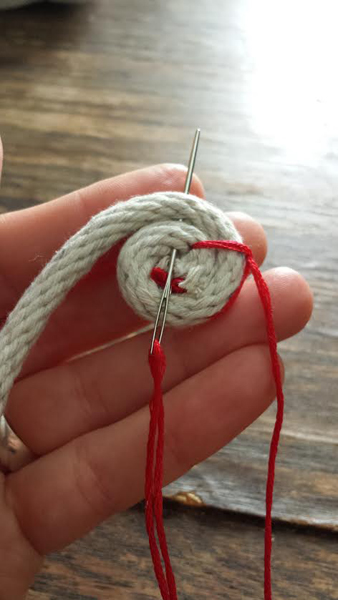
We will be using a blanket stitch for this project. Wrap your working thread behind the needle from right to left.

Photo 13
Bring the thread back over the needle from left to right and pull the needle through.

Photo 2
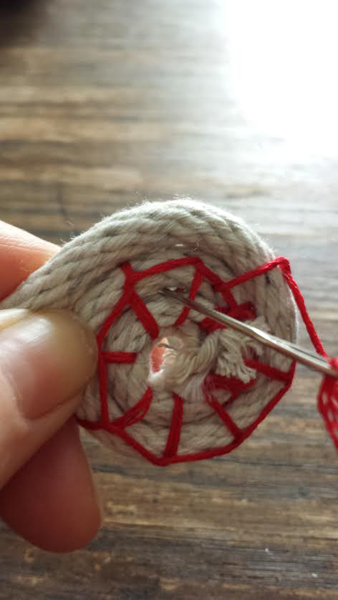
Repeat going around in a circle, entering in the center, until you reach the first stitch.

If you want a bowl with a wide flat base, you can continue the flat blanket stitch going around a few more times until the base is as wide as you like.

Photo 3
At this point you will be rounding up to give your bowl a curved shape.

To achieve this, you will be inserting the needle straight through the clothesline from front to back rather than from the center out. See pic.

Photo 4
Continue with the blanket stitch inserting the needle through the clothesline from front to back until your bowl is as large as you like.

You will most likely run out of stitching thread as you are working. To add more, tie a new 3′ length of thread to the tail of the previous working thread. Place the ends together as shown and tie in a knot.

Photo 5Photo 6
For the next few stitches, Insert the needle Between the coils instead of through the rope until your knot is hidden.

Photo 7
Once you pass the knot, continue stitching through the rope until you reach the desired bowl size.

Tie off your working thread and then snip the clothesline, You’re done!

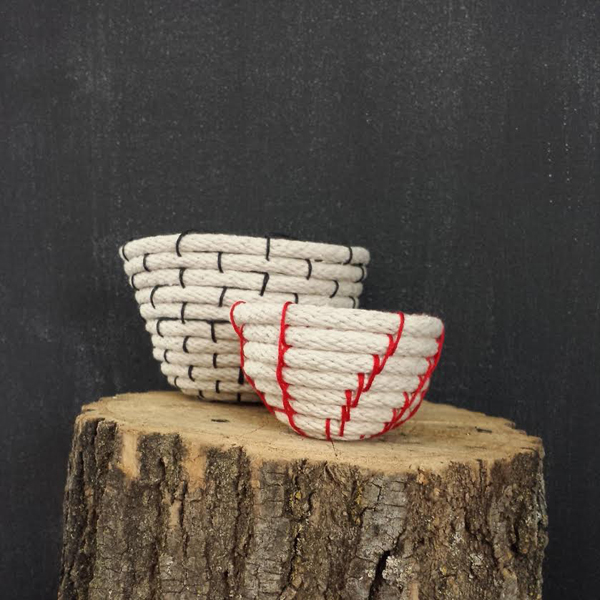
As you can see from the next photo, the placement of your stitches will determine the design of your bowl. For the black bowl, I spaced my stitches out and staggered with each layer, essentially placing new stitches between the stitches on the previous level. For the red bowl, each new stitch was placed right next to the previous level’s stitch.  Play around with stitch placement to see what you can come up with.

Photo 8
Enjoy!

—————————————————————————————————————

Christie Sommers is the designer and maker behind West Oak Design. She handcrafts small batch and one of a kind goods for home, women, and kids in her Wyndmoor, Pa studio.www.westoakdesign.com


Posted in craft projects, Uncategorized | Tagged , , , , , , , , , , | Leave a comment

Affordable Art for your Walls

I don’t know about you, but I am ready for spring!  I am sick of spending so much time indoors……Unfortunately, I think we have a few more weeks of cold and blah.  Since I’ve been inside so much, I’ve been dreaming about redecorating my own space and hanging some new prints.  Here are some of my favorites from the shop that are sure to bring some pops of color and happiness to your walls and (hopefully) a temporary cure for the winter blues.  Most are motivational and remind me of sunny days to come, others just put a smile on my face.

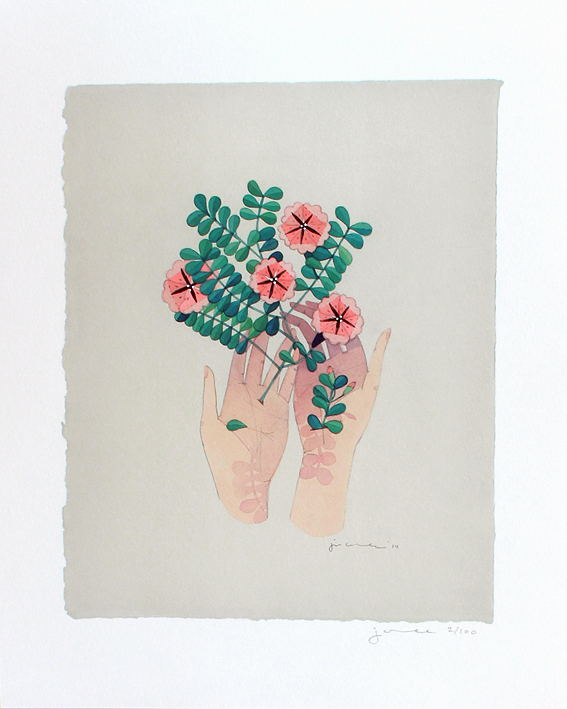
Root PrintThis print is of an original piece titled “Root” from Jen Corace’s solo exhibition at Art Star.  It is an archival pigment print on Hahnemuhle 100% cotton rag paper.  We use Silicon Fine Art Printing here in Philadelphia, so it is extremely high quality.  It is a signed, limited edition of 100 and is $40.  Buy it Here.

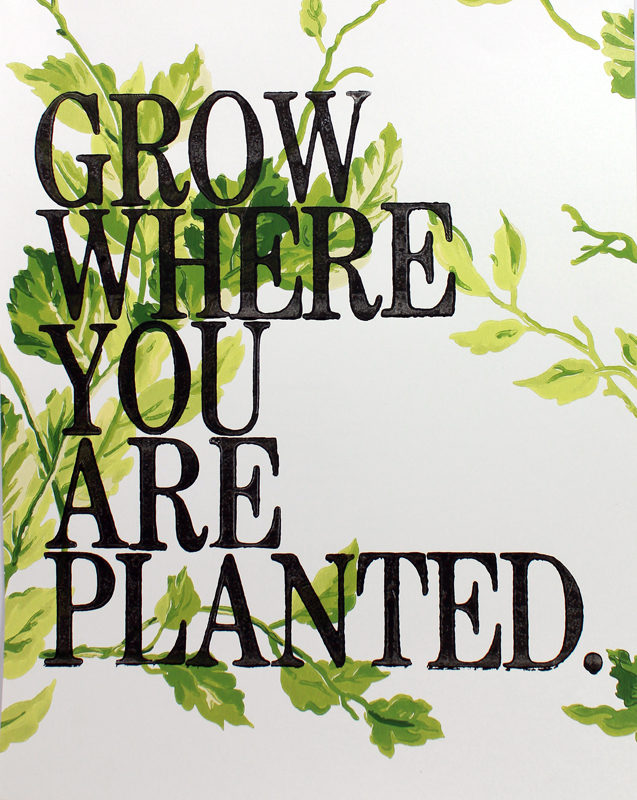
Amy Rice Grow Where You Are PlantedYou’ll see there is a theme here.  I have plants and nature on my brain.  This print is by Minneapolis based artist, Amy Rice.  Amy is a prolific artists whose work we’ve carried since we opened in 2004.  She is one of our absolute favorites!  Luckily for my wallet, Amy offers a line of affordable art prints like this one.  She enjoys painting/printing on antique letters, journal entries, maps and even high end wallpaper, like this one.  This is a hand set and hand pulled letterpress print.  I just love it!  $40 Buy it here.

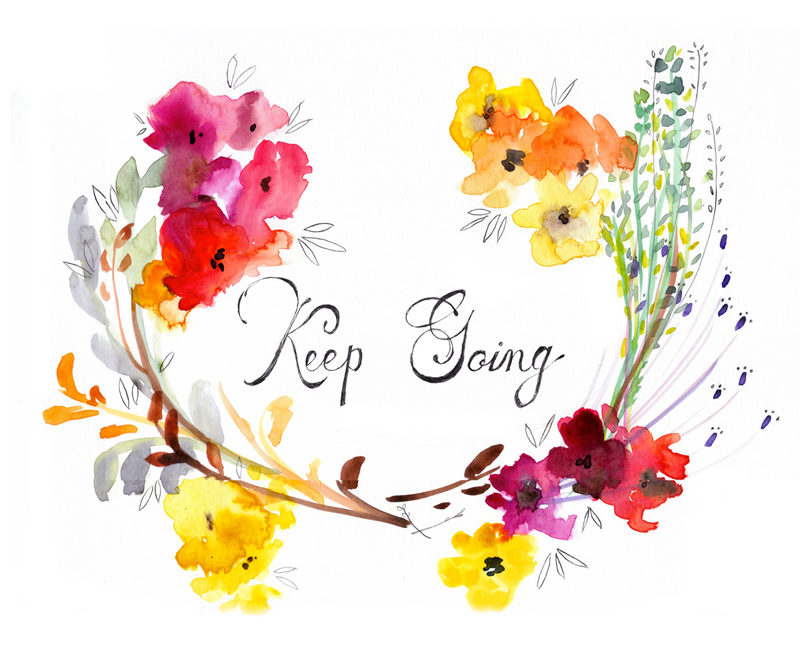
Keep Going PrintAnother floral piece with a motivational phrase.  I need it this time of year!  I love Mai Autumn’s delicate watercolors, they are so beautiful!  This one will also add a nice pop of color to any room!  This piece is available in both 8×10 and 11×14, which are both standard frame sizes.  Printed  with archival inks on Canon Pro Luster Pape and $20/$35, depending on which size you choose.  Buy it here.

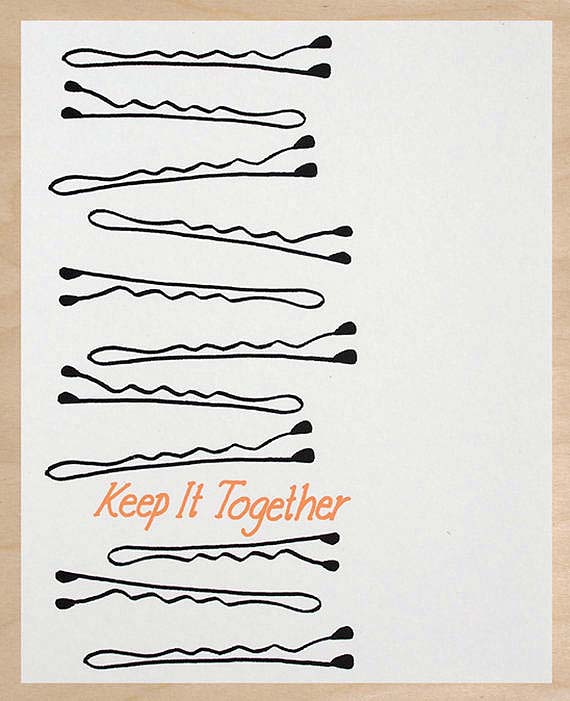
Yardsale Press Keep it TogetherA daily reminder – ha!  Plus, it makes me laugh a little b/c there are seriously bobby pins all over my house.  In the oddest places too!  For this reason, I think they are the bane of my husband’s existence.  Just kidding.  This is a screenprint by Bryan Sculthorpe of Yardsale Press, who I fondly refer to as “talls” because he is a giant and I am a midget. Just $15 – buy it here.

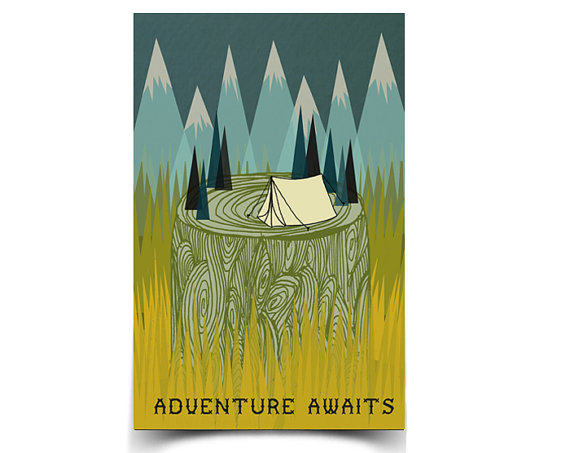
Paper Sparrow Adventure AwaitsMy husband and I have already begun planning our camping trips!  This reminds me that in a few months we’ll be sleeping under the stars.  I. cannot. wait.  This is an 11×17″ poster illustrated by Andrea Lauren of Paper Sparrow and it is printed with vegetable + soy based inks.  $18. Buy it here.

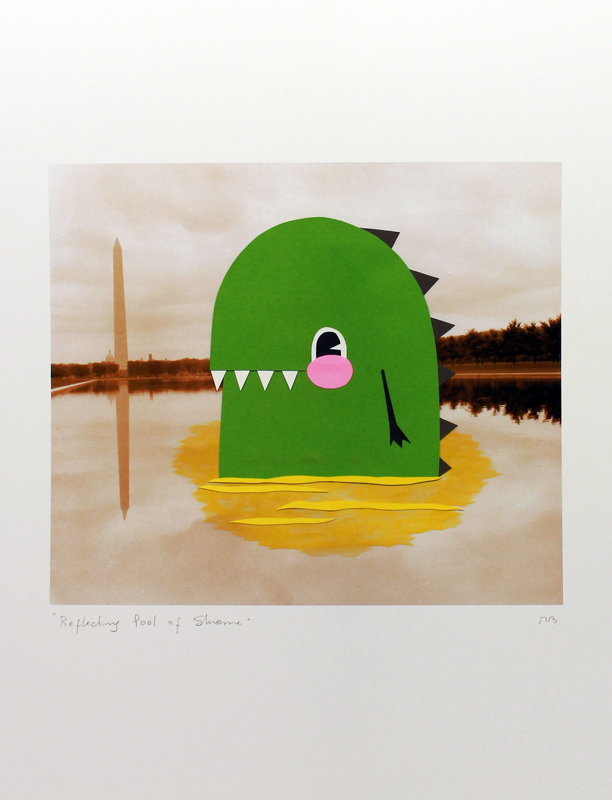
Reflecting Pool of ShameAnd finally, this gem.  Because I love art with a sense of humor most of all.  It is titled “Reflecting Pool of Shame”.  It is a reproduction of an original painting on top of a photograph by Mauro Biaocco of Naughty + Nice.  It was printed using archival ink and paper.  Don’t lie, you’ve been there!  $20 Buy it here.

I hope you enjoyed looking at my favorite Art Star prints and maybe you are inspired to pick out your own.  What are your favorites? Shop our online collection here. Or stop on by – there is WAY more in the actual store.

Posted in Gift Guide | Tagged , , , , , , , , , , , , , | Leave a comment

Bonnie’s Inspirational Wall Hanging

Photos + Tutorial by Bonnie Kaye Whitfield

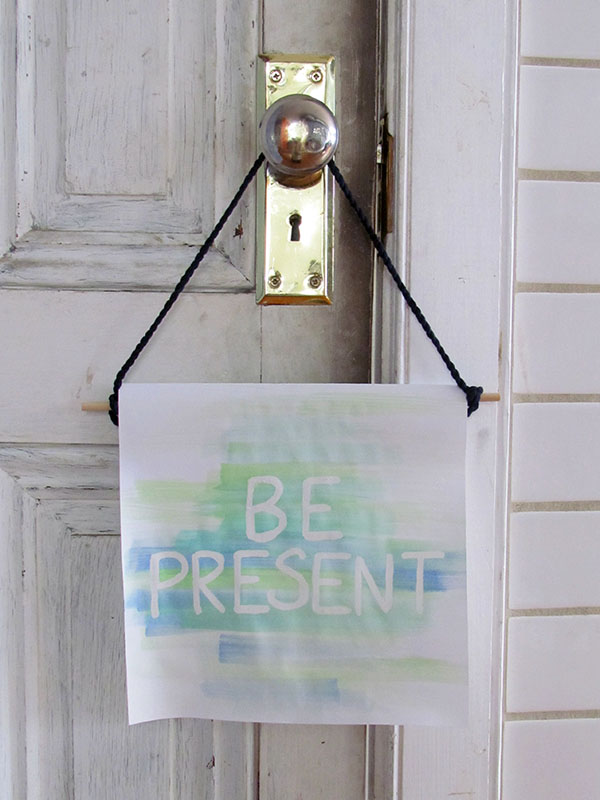
Bonnie_Blog3_Pic9

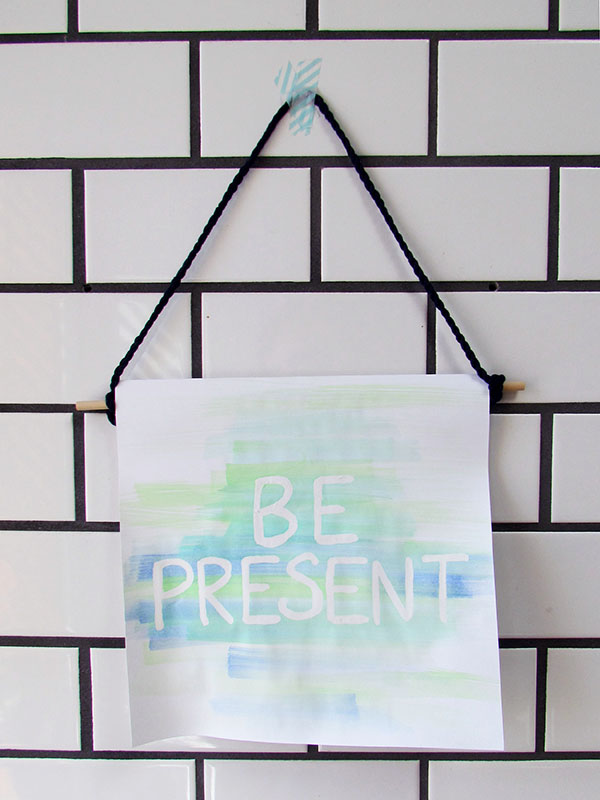
Sometimes everyone needs a little pick-me-up, especially in the studio or office, where it’s easy to get overwhelmed with projects and deadlines.  These simple inspirational wall hangings combine the magic of masking fluid and watercolor to create your own, personalized message that will keep your chin up and head high.

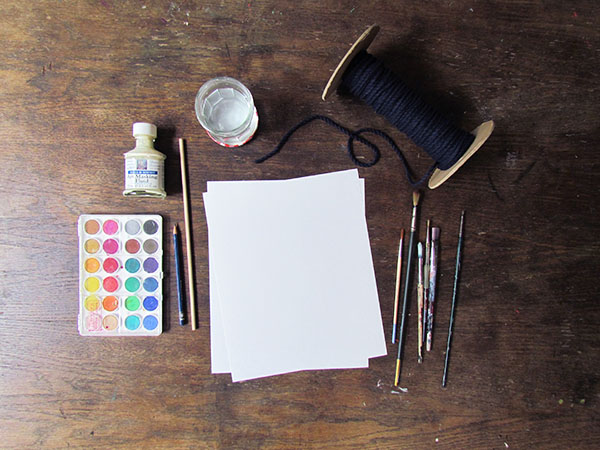
You will need:

  • white or cream cardstock or smooth watercolor paper
  • pencil
  • art masking fluid
  • old, thin brush (one that you don’t mind tossing in the trash after use)
  • watercolor
  • watercolor brushes
  • container of water
  • wooden dowel (optional)
  • heavy duty tape or hot glue gun (optional)
  • rope or twine (optional)

Bonnie_Blog3_Pic1

As you gather your materials, make sure you have thick, smooth paper to work with; any paper that is “soft” or textured will not work well with the masking fluid.  Also, note that the last three materials are optional and needed only if you want to hang your message as pictured.  Otherwise, you could simply cut your wall hanging to size for a frame or pin directly onto your wall.

Bonnie_Blog3_Pic2

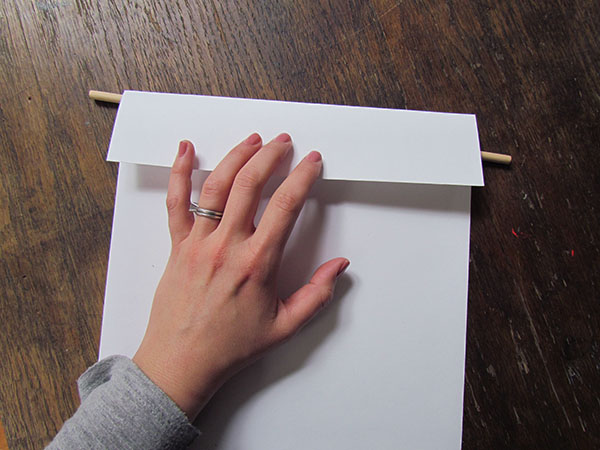
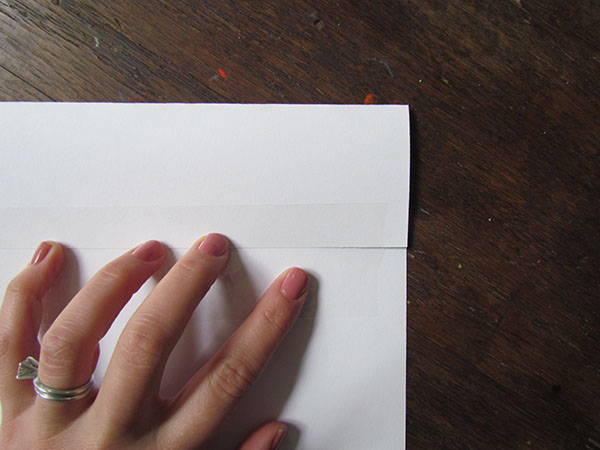
If you want to hang using a dowel rod, you’ll first want to cut your paper so that the width of the paper is about 2” shorter than your dowel rod.   Next, go ahead and fold down the top edge of the wall hanging (approx, 2”).  This will serve as your loop for inserting your dowel rod.  Wait to tape down the flap until the very end.

Bonnie_Blog3_Pic3

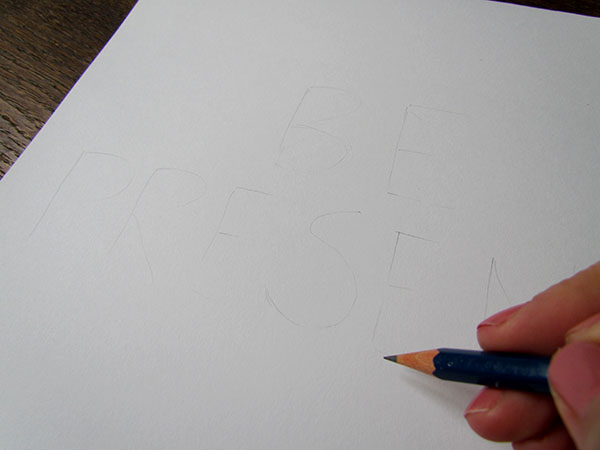
Flip your wall hanging over, so that you are now working on the front side of the paper. Decide your message, font, and layout, and lightly sketch out the words on your paper using a pencil.

Bonnie_Blog3_Pic4

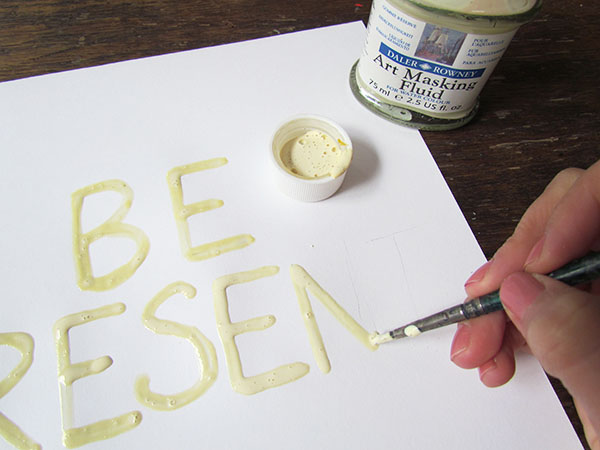
Next, grab your old brush.  Working quickly, apply the masking fluid over your penciled-in letters.  The masking fluid is basically liquid rubber.  It will be blocking, or masking, the watercolor.  It does dry fairly quickly, so you’ll want to work quickly and then immediately clean your brush after using the masking fluid, otherwise, you might have to throw away your brush.

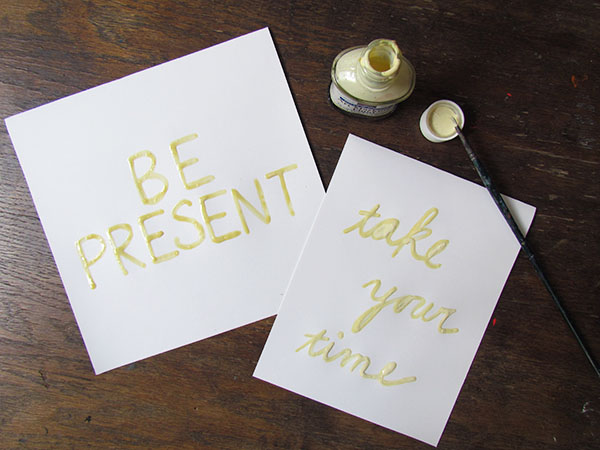
Let the masking fluid letters dry thoroughly.  It should dry darker, and you can test if it’s dry just by gently touching it.

Bonnie_Blog3_Pic5

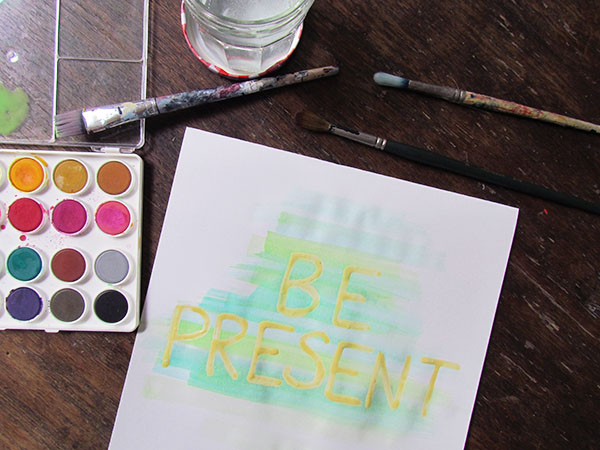
Once the masking fluid has dried, you can add watercolor to your wall hanging.  In order for the letters to show up, you’ll need to apply watercolor on top of and around all the letters.

Bonnie_Blog3_Pic6

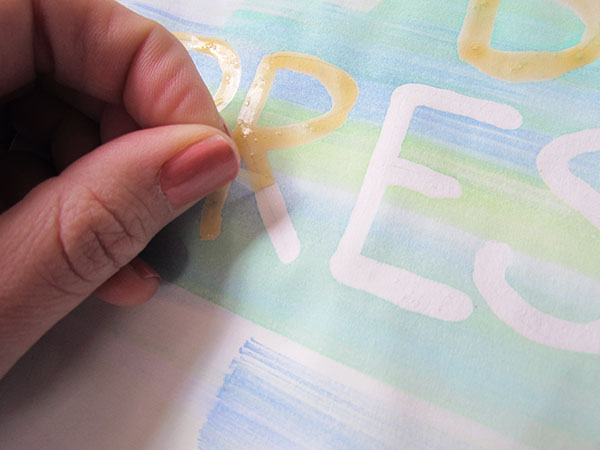
Now for the hardest part … waiting!  The watercolor and paper must dry completely before peeling off the masking fluid.  Trust me, I have learned this lesson the hard way.  If it’s not dry, the paper will start to pull off with the masking fluid.  When you think it’s dry, you can begin to rub/pull the masking fluid off gently.  When all the dried letters are removed, you can erase any pencil lines showing.

Bonnie_Blog3_Pic7

Lastly, flip the hanging over and tape down the flap.  Insert the dowel rod.  Cut your rope or twine to desired length and tie to the ends of the rod.

Bonnie_Blog3_Pic8

Hang in a visible area, get back to work, and stay inspired.

Bonnie_Blog3_Pic10

—————————————————————————————————————-

Bonnie Kaye Whitfield designs and screen prints home textiles + paper goods under the name, Bonnie Kaye Studio.  Products are created to inspire memories at home and around the table.  A donation is made with every purchase to help feed hungry Americans.
www.BonnieKayeStudio.com


Posted in craft projects | Tagged , , , , , , , | Leave a comment

Christie’s Herbal Conditioning Rinse Tutorial

Tutorial + Photos by Christie Sommers of West Oak Design

Here is a miracle rinse to tame the driest of winter hair. Don’t be afraid of the vinegar… I promise you won’t smell it in your hair after your shower. The acidity of apple cider vinegar smooths the hair cuticle and leaves the frizziest hair looking shiny and healthy and feeling incredibly soft.  Try this herbal rinse as a treat for yourself.. or your valentine.

You will need:

-3 cups of filtered water (separated)
-1/2 cup of apple cider vinegar
-A few sprigs of rosemary (dry or fresh)
-2 teaspoons of lavender..use more or less to your liking.
You can add just about any herbs you like according to your scent preferences. I added chamomile. This recipe is very flexible
-5-10 drops of essential oil of your choice (I used rosemary & lavender)

Image 1

*Boil 2 cups of filtered water

*Remove from heat and add your herbs. I use rosemary for its clarifying properties, lavender for its relaxing scent, and chamomile which adds subtle golden highlights. Note: try hibiscus for red highlights

Image 2

*Let steep for at least 45 minutes. The longer the better. Sometimes I’ll let it sit covered all day.
*Allow herbal tea to cool completely.
*Pour tea through a fine mesh sieve to remove herbs.  A tea ball infuser works well too.

Image 3

*Add 5-10 drops of essential oil to…
* 1/2 cup of apple cider vinegar

Image 4

*Add 1 cup filtered water to the filtered “tea”, then add the vinegar/oil mixture

Image 5
*Recipe yields 3 cups.
*I fill a spray bottle for the shower and pour the remainder into a mason jar for later.
*I wash my hair every other day and use this rinse every time.

After 2 or 3 uses you should begin to see a huge improvement in the softness and shine of your hair.

Enjoy!

_____________________________________________________________

Christie Sommers is the designer and maker behind West Oak Design. She handcrafts small batch and one of a kind goods for home, women, and kids in her Wyndmoor, Pa studio.www.westoakdesign.com

Posted in craft projects | Tagged , , , , , , | Leave a comment